File Menu
The File menu ( F3) contains commands for managing files:
Commands
- New – Starts a new, empty project using the last selected drum kit template as a start point. You will be prompted to save any changes made to the current project.
- New from template – Contains a submenu with a selection of different templates – Genre, Minimal, Other and Utility. To change the default template when FL Studio opens –
- 1. Select File > New from template >, etc. – where, etc. is the template you want to use.
- 2. Close FL Studio – without making any changes to the project.
- 3. Open FL Studio – The template you selected will now be the default on opening.
Template projects are saved in the FL Studio installation folder: ..\Program Files\Image-Line\FL Studio\Data\Projects\Templates. You can save a customized project there and perform the above steps to set it as your default project.
- Open ( Ctrl+O) – Opens an existing project. The Open File dialog is enhanced with a Favorites section.
- Save ( Ctrl+S) – Updates the project by overwriting the last saved copy on disk. If the current project has not been saved a name dialog will open prior to saving. For a list of available save formats, see the File Formats page.
- Save as ( Shift+Ctrl+S) – Saves the current as a different name and/or format. For a list of available save formats, see the File Formats page. The Save File dialog is enhanced with a Favorites section.
- Save new version ( Ctrl+N)- Saves the current project as a file with a unique name. For example, if you have a project called MyProj, this command saves a file named MyProj_2. Next time it will be called MyProj_3, etc. This feature is useful for saving versions of the project without overwriting the original file.
- Import – Loads files that are not FL Studio native projects. For a complete list of file types you can import, see the Open/Import File Formats page. The Import File dialog is enhanced with a Favorites section.
- Export – Converts the current project to various file formats. For a complete list of file types you can export to, see the File Formats page.
- Zipped loop package – This saves both the .flp (project data) and samples associated with the project in a standard ZIP file format. This is a great way to archive your important projects so that you don’t lose the sounds associated with it.
- Wave file ( Ctrl+R) – The Wave format is a widely used uncompressed audio format used in distributing production quality audio. If you plan to burn a standard Audio CD then you will need export 44.1 kHz 16-Bit Wave (.wav) files. NOTE: FL Studio does not burn CDs.
- mp3 file ( Shift+Ctrl+R) – mp3 (Mpeg Audio Layer 3) is a compressed audio format useful for sharing music over the internet and compatible mp3 players. While .mp3 audio quality can be excellent (@ rates of 224 kbps and above) it is not recommended for archiving production quality audio.
- ogg file – ( Shift+Ctrl+R) – ogg (Ogg Vorbis) is an open-source compressed audio format useful for sharing music over the internet and compatible Ogg players. While Ogg audio quality can be excellent (@ rates of 224 kbps and above) it is not recommended for archiving production quality audio.
- MIDI file ( Shift+Ctrl+M) – MIDI (Musical Instrument Digital Interface) format saves musical note (score) and control data associated with projects. NOTE: MIDI does not contain nor save audio. Your PC may make sound when you run a MIDI file as many soundcards can interpret and play MIDI data.
- Project bones – Use this command as a shortcut to export all generator/effects settings as presets (*.fst files) and score/automation data as score files (*.fsc files) used in the current project. This is useful for merging components from one project into another. Also, a *.nfo file will be created in the folder you selected to store the preset/score data, that is used by the Browser.
- Project data files – Saves copies of all samples, TS404 shapes and SimSynth/DrumSynth presets and other plugin data used in the current project into a single folder of your choice.
- Recent projects ( Alt+ 1 to 0 (10)) – Appears as a list of the 10 most recently opened projects at the bottom of the File menu, with the most recent one at the top.
- Exit – Closes FL Studio, prompting you to save any changes to your current project.
Edit Menu
The Edit menu contains commands for selecting and editing channels and notes (the contents of the menu will depend on what window in FL Studio is selected).
Commands
- Undo/Redo ( Ctrl+Alt+Z/Ctrl+Z) – These two commands allow you to step through the edit history of FL Studio (to see a list of the actions currently stored in the history, open the Project Browser / History folder). Ctrl+Alt+Z steps back through the history. Ctrl+Z steps forward through the history, unless you are at the latest step (in this case, Ctrl+Z works as the standard one step undo/redo shortcut).
- Cut ( Ctrl+X) – Cuts the notes from all selected channels in the Step Sequencer to clipboard. Automation events cannot be cut using this command.
- Copy (Ctrl+C)- Copies the notes from all selected channels in the Step Sequencer to clipboard. Automation events cannot be copied using this command.
- Paste ( Ctrl+V ) – Pastes notes from clipboard, starting with the uppermost selected channel in the Step Sequencer.
- Shift left ( Shift+Left) – Shifts the notes from all selected channels in the Step Sequencer one step left. First notes become last notes.
- Shift right ( Shift+Right) – Shifts the notes from all selected channels in the Step Sequencer one step right. Last notes become first notes.
- Randomize ( Alt+R/Alt+H) – Opens the Randomizer dialog, allowing you to create random notes and to randomize the note properties for all selected channels in the Step Sequencer.
- Send to Piano roll – Moves the notes from all selected channels in the Step Sequencer to the Piano roll of each channel. Shuffle is preserved (see the Step Sequencer).
Channel Menu
The Channels menu contains commands for managing channels.
Commands
- Add one – Contains a list of all Instruments selected as favorites. Choosing a instrument from this menu will add a single instance of it at the bottom of the Step Sequencer window. Click More… to open the Select plugin window, that contains a list of all instruments present in FL Studio (including VSTi and DXi).
- To open a channel containing a plugin – Double-click the instrument name.
- To mark a instrument as a ‘favorite’ – Click the check box preceding the instrument name (all plugins preceded by a check mark will appear in the favorites list).
- To see newly installed plugins – Click Refresh in the bottom of the ‘Select plugin’ window and select Fast Scan rather than ‘Scan & Verify‘, because it takes a long time to scan since every plugin is opened and verified (which can crash FL Studio if there are buggy plugins). Scan & Verify does, however, sort instruments and FX. VSTi (instruments) are put into a VSTi folder (Channels > Add one > More) and VSTs (FX) in the VST folder (found in the mixer when choosing the VST effect).
NOTE: See the Browser ‘Using Browser content’ section for alternative (faster) ways to load plugins.
- Clone selected (Shift+Ctrl+C) – Inserts a clone of each selected channel in the Step Sequencer right after it. The clone retains the instrument type of the original, as well as all of its settings, but does not contain its notes and events.
- Delete selected (Ctrl+Del)- Removes all selected channels in the Step Sequencer.
- Move selected up ( Alt+Up) – Moves all selected channels one step up in the Step Sequencer.
- Move selected down ( Alt+Down) – Moves all selected channels one step down in the Step Sequencer.
- Group selected ( Alt+G) – Adds all selected channels to a group (a popup window displays to enter the name of the group). If a group with the name you specified doesn’t exist, it will be automatically created. For more information on channel grouping see the Channel Filtering section in the Step Sequencer page.
- Color selected – Provides several options for colouring channel buttons. Useful for grouping instrument types/sections.
- Gradient ( Alt+C) – Opens a dialog for selecting start and end colors. All selected channels will be colored in sequence from the start to end points in the color space selected.
- Random ( Ctrl+Alt+C) – Colors channels randomly. This function contains some rules on coloring so it won’t look as bad as you might expect.
- Zip selected ( Alt+Z) – Turns all selected channels in the Step Sequencer into compact view mode. Right-click the button of a zipped channel to unzip it.
- Unzip all ( Alt+U) – Unzips all channels in the Step Sequencer.
- Restretch all – Active only when tempo automation is used. When the tempo is automated the auto-restretch feature is disabled as it is not a real-time process. This feature allows you to adjust the tempo manually and force a restretch.
View Menu
The View menu contains commands for showing/hiding and arranging FL Studio windows.
Windows
- Playlist ( F5) – Shows/hides the Playlist window.
- Step Sequencer ( F6) – Shows/hides the Step Sequencer window.
- Piano roll ( F7) – Shows/hides the Piano roll window.
- Browser ( F8) – Shows/hides the Browser window.
- Mixer ( F9) – Shows/hides the Mixer window.
- Channel settings – Shows/hides the Channel Settings window.
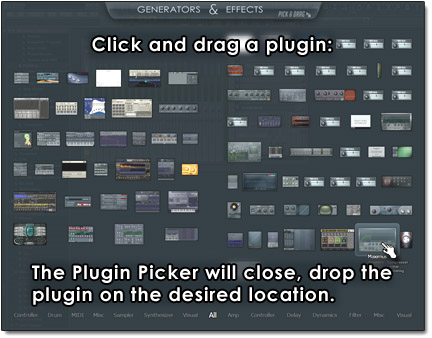
- Plugin picker ( Ctrl+F8) – Displays an array of plugins (effects left, instruments right). To use the Plugin picker, click, hold and drag the icon associated with the plugin you want to use and the picker list will close. Drop the plugin on the target location inside FL Studio. See the Browser section of the manual for details on customizing the Plugin picker.
- Toolbars –
- Select / Deselect Transport, Output monitor, CPU, Shortcut, Extra shortcut, Recording, Time, Online, Hint Bar panels. The Hint bar option displays an additional floating Hint Bar panel in the lower-left corner of the FL Studio interface.
- Lock – Locks the position of the Panels in the upper docking bar.
Layout
- Close all windows – ( F12) – Closes all windows in FL Studio.
- Close all unfocused windows – ( Ctrl + F12) – Closes all unselected (unfocused) windows .
- Arrange windows
- Default – ( Shift+Ctrl+H) – Restores the default layout.
- Alternate – Simply an alternate layout. Try it, you may like it 🙂
- Outside bottom taskbar – Extends the FL studio desktop so that it is under the Windows taskbar.
- Save current arrangement – Saves the current layout, to be used next time FL Studio is restarted.
- Background – Allows you to choose wallpaper for FL Studio main window.
- Set bitmap wallpaper – Allows you to use an image for the main window background.
- Set HTML document – Lets you choose an HTML document for the main window background.
Browser
- Undo history – Expands the history section in the Project Browser.
- Automation – Expands the history section in the Project Browser.
- Generators in use – Expands the instruments section in the Project Browser.
- Effects in use – Expands the effects section in the Project Browser.
- Remote control – Expands the remote control section in the Project Browser.
- Plugin database – Opens the Plugin Database ( Shift+F8).
Options Menu
The Options menu contains commands that set options in FL Studio.
System
- MIDI settings ( F10) – Shows/hides the MIDI Settings window.
- Audio settings – Shows/hides the Audio Settings window.
- General settings – Shows/hides the General Settings window.
- File settings – Shows/hides the File Settings window.
Project
- Project info ( F11) – Shows/hides the Project Info window.
- Project general settings – Shows/hides the Project Settings window.
MIDI
- Enable MIDI remote control – If unchecked, you will not be able to use MIDI remote control in FL Studio, but the device you use for remote control will be released for use in other applications you run simultaneously with FL Studio.
- Enable MIDI output – If unchecked, you will not be able to use MIDI output in FL Studio, but the device you use for output will be released for use in other applications you run simultaneously with FL Studio.
- Enable MIDI master sync – If checked, FL Studio will sync (as a master) with an external MIDI device or a sequencer. You can choose a device to sync with in the MIDI Settings window.
Switches
- Typing keyboard to piano ( Ctrl+T) – When enabled, you can use your typing keyboard to record notes as you would do with a real MIDI keyboard.
- Metronome ( Ctrl+M) – When enabled, you will hear a short “metronome” sound at the beginning of each beat and an accent at the beginning of each bar. This is especially useful if you need to keep yourself synced with the song tempo when recording a melody from a MIDI keyboard. NOTE: For the metronome options (including Mixer track routing & changing the click-sound) see the Recording Panel page.
- Recording precount ( Ctrl+P) – When enabled, you will hear a series of countdown metronome ticks before the start of a recording session.
- Start on input ( Ctrl+I) – When enabled, pressing the play button will set FL Studio to waiting mode and actual playing/recording will begin when input data is received (e.g. when a key on the MIDI keyboard is pressed ).
- Blend recorded notes ( Ctrl+B) – When switched on, the notes you record will blend with any already existing ones, otherwise recorded notes will overwrite the old ones.
- Step edit ( Ctrl+E) – Switches step recording on/off.
- Loop record – Loop record continuously repeats the selection marked in the Playlist (Shift + Left-click and drag in the bar-marker region) to allow you to layer MIDI or audio data. For audio to be placed automatically in the Playlist on each loop, turn on ‘Auto create audio clip’ in the Mixer menu > ‘Disk recording’ options.
- Auto scrolling – Turns on/off the auto-scrolling feature in the Playlist and Piano roll.
- Enable groups – Enables Piano roll note and Playlist pattern grouping. Use the Piano roll & Playlist ‘Group’ menu option to group/ungroup selected notes/patterns.
- Multi-link to controllers ( Ctrl+J) – For more detail see the section on Using External Hardware Controllers. To link multiple controls in one session, use the Multi-link option on the recording panel. Select the switch, tweak all the target controls, then tweak the same number of knobs on your hardware controller and turn off the switch (most people can remember about 7 links, how good is your memory?).
Tools Menu
The Tools menu contains useful tools for working with channels, patterns, effects and provides the ability to use external applications as tools inside FL Studio.
Commands
- Browser smart find ( Ctrl+F) – Searches the directories in the Browser for any text entered here.
- One-click audio recording:
- I want to record audio…
- Into Edison audio editor/recorder – Loads Edison into the Master Mixer track and prompts for an audio input. See the Audio Recording section for advanced training (highly recommended).
- Into Playlist as an Audio Clip – Records audio from the Master Mixer track and prompts for an audio input. See the Audio Recording section for advanced training (highly recommended).
- I want to record audio…
- Macros
- Patterns:
- Rename current pattern ( F2) – Launches the pattern rename dialog.
- Jump to next empty pattern ( F4) – Switches to the next pattern that does not contain any note events (either in the Step Sequencer or the Piano roll) in any channel.
- Panic:
- Stop sound ( Ctrl+H) – Stops all notes playing.
- Cancel recording – Cancels the current recording and purges the .wav file.
- Misc:
- Switch smart disable for all plugins – Turns on Smart Disable for all plugins (instruments & effects), this turns off plugins when they are idle and can reduce CPU load significantly. There is also a global Smart disable on the F10 Audio settings panel. Alternatively plugin wrapper menus have individual smart disable options.
- Prepare for MIDI export – Replaces all channels with auto-configured MIDI-out channels. Use this before rendering to MIDI. If you want the file to play on any soundcard using the inbuilt general MIDI (GM) sounds then you will need to assign GM patches to each channel:
- 1. Load a Fruity LSD plugin into a Mixer track.
- 2. Set the various MIDI Out channels to the same port number as the LSD plugin.
- 3. From the MIDI Out Patch control, select general MIDI sounds that match as closely as possible your original channels.
- 4. Render to MIDI and the MIDI file will play on any soundcard with the correct GM sounds. NOTE: if you are making GM files from scratch you should build your song this way from the start.
- Select unused channels – Selects all channels that do not contain any notes (neither in the Step Sequencer or the Piano roll) in any pattern.
- Purge unused audio clips – Removes any Audio Clips that do not have associated note data or appear in the Playlist (i.e. are not being used in the current project.
- Patterns:
- Riff machine – Opens the Riff machine, an automated score generation wizard. Opening the Riff Machine from the Tools menu, rather than from the Piano roll Menu will auto-create a channel, with a randomly chosen preset, from an Image-Line approved list of sounds. After all, you are in a creative slump and need all the help you can get!
Clipboard
These options are grayed out if no data is available.
- Save audio clipboard to browser – Creates a .wav file of the current Audio Clip-board and saves it in \Data\Patches\Clipboard files of the FL Studio installation directory.
- Save MIDI clipboard to browser – Creates a .mid file of the current MIDI clip-board data and saves it in \Data\Patches\Clipboard files of the FL Studio installation directory.
Score logger
- Dump score log to selected pattern – Saves the contents of the score logger into the Piano roll of the selected pattern and channel. The score logger is always on and buffers all note activity from external controllers or typing keyboard to piano activity from the last 3 minutes. A copy of the current log can be dumped to the Piano roll at any time. Never lose that perfect improvisation again!
Last tweaked parameters
- Last tweaked – Several options that apply to the last tweaked parameter on any part of the GUI including plugin GUI’s. NOTE: The last tweaked parameter name will be displayed at the top of the menu.
- Edit events – Opens the Event Editor for the last tweaked control. This data will be saved in the currently selected pattern. There are also sub-options to edit events in a ‘new window’ or in the integrated ‘Piano roll’ editor.
- Edit events in new window – If an Event Editor window is already open, this option will become available to allow you to edit a last tweaked parameter in a new event editor window.
- Edit events in piano roll – If a Piano roll is already open, this option will become available to allow you to edit a last tweaked parameter in a new Piano roll.
- Init song with this position – Defines the starting position for the control/knob when the song starts to play. You will need to press STOP, then PLAY, for this to take effect.
- Create automation clip – Creates an automation clip linked to the last moved knob.
- Link to controller – Opens the Remote control settings dialog that allows an external controller to be linked to the tweaked control.
- Copy value/Paste value – Allows you to copy and paste the values of knobs and other controls.
- Override volatile link – Creates a ‘Generic floating-link‘ between the last tweaked user interface parameter and the controller knob that was moved when the ‘volatile link’ was initiated. Endless knobs or a jog-wheels make good volatile target controllers. See the section on linking hardware controllers for more details.
- Before last tweaked – Several options that apply to the second last tweaked parameter on any part of the user interface including plugin user interface’s. NOTE: The second last tweaked parameter name will be displayed at the top of the menu.
- See Last tweaked options.
External
- External tools… – Opens the External Tools dialog that allows you set external applications (wave editors, sample browsers, etc.) as tools in FL Studio.
Help Menu
The Help menu contains commands for access to this reference system and other help documents.
Help
- Contents (F1)- Opens this help system.
Registration
- Product information – Click here to find out more about Image-Line products.
- Register your trial version – Click here to register a demo version of FL Studio.
- Paste registration key – For ‘Box’ customers. If you have not yet registered FL Studio via the internet, this will allow you to paste in your registration key that shipped with your Boxed version of FL Studio.
- Register access to website – Takes you to the ‘My FL Studio’ section of the Image-Line website.
Internet links
- Create your own (music) website – A link to the homepage of EZ Generator, Image-Line’s web development program. And you thought we only make music software? 🙂
- Deckadance DJ Mixer homepage – Takes you to the home page of Deckadance, Image-Line’s DJ software package.
- DrumSynth homepage – A link to the homepage of DrumSynth. FL Studio can render DrumSynth presets directly.
- FL Studio diagnostic tool – A link to a Diagnostic Tool to help tech-support understand any problems you may be having. The tool also has some FLP recovery features to help you recover corrupted projects.
- FL Studio homepage – FL Studio website
- FL Studio tutorials – Links to the tutorials section (videos, etc.) on the FL Studio website.
- Image-Line – Global Image-Line website, the mothership!
- LAME .mp3 encoder homepage – Take you to the homepage of LAME .mp3 Encoder. LAME .mp3 Encoder is integrated in FL Studio and can be used to export .mp3 files. Despite the name, this is arguably the best quality encoder available.
- SoftVoice Text-to-Speech homepage – A link to the Softvoice Inc. website, the speech synth as used in FL Studio.
- Sytrus synthesizer homepage – Takes you to the homepage of Sytrus, the flagship Synthesizer plugin used in FL Studio.
About
- About… – Opens the ‘About’ box to display version number, credits, etc.
External Tools Dialog
The External Tools dialog lets you set up external applications (wave editors, sample browsers, etc.) for use as tools in FL Studio.
Options
- Tools List – Displays a list of all configured tools. Before setting up a new tool click an empty field in the list, otherwise the new tool will overwrite the older one. You can also drag the entries up and down to change the order.
- Tool Properties – Displays the program icon of the application and enables setting of the displayed name of the tool in the Tools menu.
- File Location – Enter the full path to the external application to be used as a tool. Alternatively, click the button on the right to browse for an application.
- Tool Type – Sets the launching option for the tool:
- Launch with sample – Suitable for wave editors. Enabled with the Default Editor, this external tool replaces the internal Wave Editor (Edison) inside FL Studio.
- Launch with sample path – Useful for batch audio processing applications and external sample browsers.
- Launch at startup – Launches the program at FL Studio startup, such as a software synthesizer or MIDI loop-back device.
Favorites Section
All open/import and save/export dialogs in FL Studio have a Favorites function to quickly jump to frequently used folders.
-
- Favorites Combo Box – Contains a list with shortcuts to all favorite folders you have set.
- Set As Favorite – Adds the current folder to the favorites.
- Remove From Favorites – Removes the currently displayed folder in the combo box from the favorites list.